Ultimately, the purpose of every generation of Superfetch has been the same: to increase the performance of Windows by preloading apps you frequently use into RAM before you need to use them. But what is Superfetch?
How Does Superfetch (Sysmain) Work?
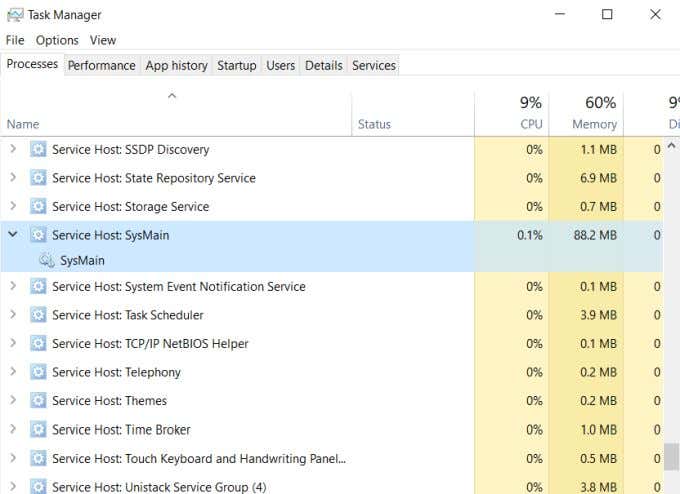
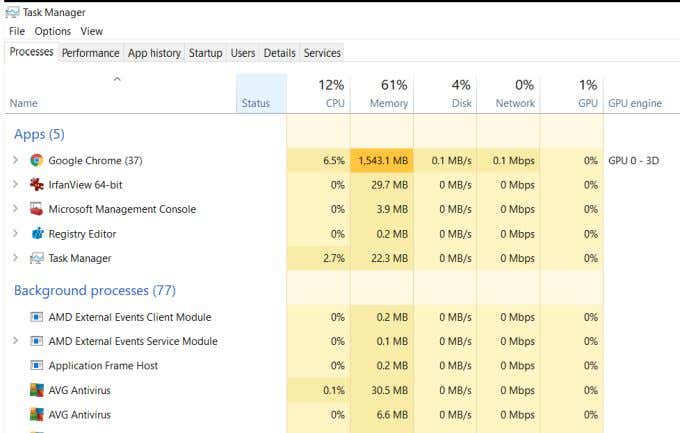
In the latest versions of Windows 10, the Superfetch service now shows up under the name SysMain. In the Task Manager, it shows up as Service Host: SysMain. If you’re running an older version of Windows 10 or any version of Windows 7 or 8, this will show up in the Task Manager as Service Host: Superfetch. This service runs in the background (using very little CPU power) and analyzes how much RAM you’re using and what apps you run most frequently. Any apps the service recognizes as “frequently used”, it’ll start preloading the app into RAM. This way, the next time you run the app, it’ll launch much more quickly. You may be concerned that this means Superfetch is using up all of your RAM, but it isn’t. The service focuses on pre-loading apps into unused RAM. This doesn’t register as consumed memory. You’ll see this if you open Task Manager to the Processes tab and look at your Memory usage. Even though Superfetch is consuming all unused RAM with preloaded apps, consumed RAM usage still doesn’t show 100%. This is because Superfetch is running in the background, and it’ll release any unused RAM it’s using whenever you need to use that memory for other active tasks.
Should You Kill Superfetch (Sysmain)?
Generally, there’s no need to stop Superfetch from running. It uses a very miniscule amount of CPU, and only uses unused RAM. All of this is unnoticeable to the general user. However, there have been some reports throughout Microsoft user forums that sometimes the Superfetch (Sysmain) process actually causes performance issues. Some of these reported issues include:
Constant 100% disk utilization.Overheating leading to system shutdown.Slow bootup time when you start your computer.On weak hardware, Superfetch could use more CPU and RAM than you might like.Has been known to cause performance issues while gaming.
The most common problem people report is the 100% disk utilization issue. If this is you, then disabling Superfetch or Sysmain may resolve the problem. Since Superfetch is only a system optimization feature, you won’t hurt Windows by stopping the service. However, you may notice that launching your favorite apps may take a little longer than usual.
How To Disable Superfetch (Sysmain) In Windows 10
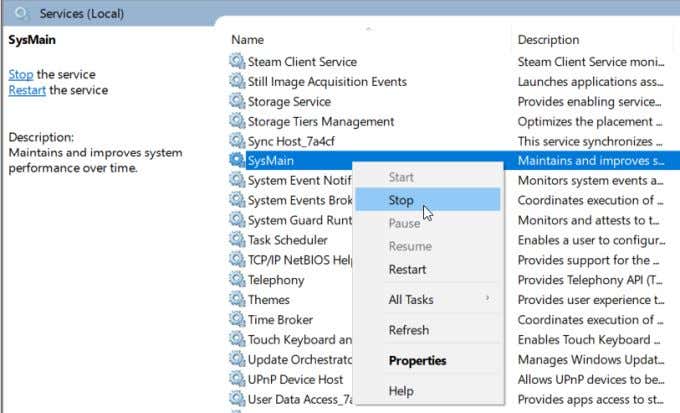
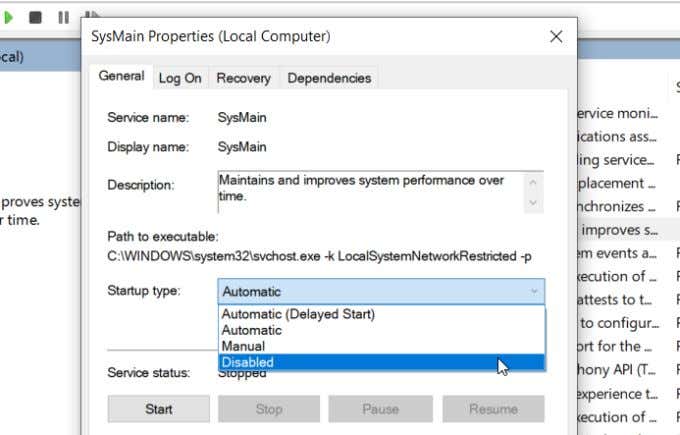
Is it safe to disable Superfetch? If you aren’t experiencing performance issues or other problems, it’s a good idea to leave Superfetch (Sysmain) running. It is a useful process that significantly cuts down on the time it takes you to launch programs that you use frequently. However, if you are experiencing high hard drive utilization, constant memory issues, or overall poor performance, you can try disabling Superfetch to see if it resolves the problem. If it does, then leave the service disabled. Otherwise, turn it back on and continue troubleshooting. To disable Superfetch (Sysmain) on Windows 10: Now the SuperFetch (SysMain) service is permanently disabled and will not restart the next time you start your computer.
Disable Superfetch (Sysmain) With Registry Editor
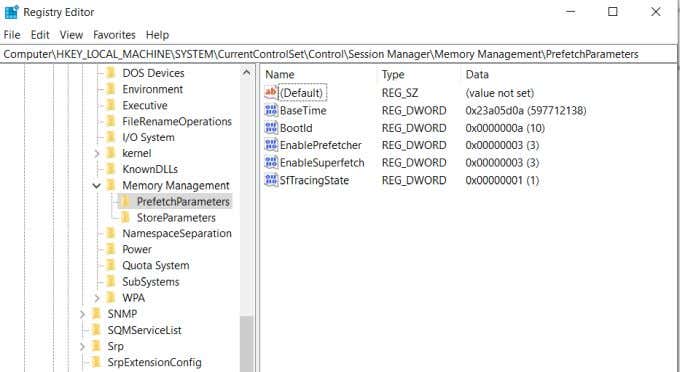
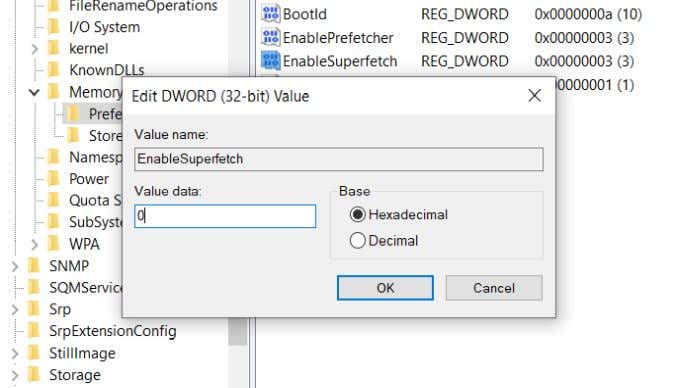
An alternative to using Task Manager to disable Superfetch on Windows 10 is using the Registry Editor. Before you start doing anything inside the registry, make sure you take a full backup of the registry first, just in case anything goes wrong. When you’re ready: You can close the Registry Editor when you’re finished. This registry entry will disable the SuperFetch (SysMain) service on your system. However, you may need to restart your Windows machine before this registry setting takes effect.
Enable Or Disable SuperFetch (SysMain) With Command Prompt
If you prefer working with the command prompt, there are some simple commands you can use to enable or disable the SuperFetch service. Open the command prompt in administrator mode first, and then use the following commands:
Enable: sc config “SysMain” start=auto & sc start “SysMain”Disable: sc stop “SysMain” & sc config “SysMain” start=disabled
Note: If you’re using an older version of Windows, replace “SysMain” with “SuperFetch” in the commands above. If you prefer PowerShell, open it with administrator rights and use the following commands:
Enable: Set-Service -Name “SysMain” -StartupType Automatic -Status RunningDisable: Stop-Service -Force -Name “SysMain”; Set-Service -Name “SysMain” -StartupType
This approach can be much faster and simpler than clicking around in the Task Manager or the Windows registry.
What If This Doesn’t Fix The Problem?
If disabling SuperFetch (SysMain) doesn’t resolve your issue, then something else may be the source of the problem. If you’re still having 100% disk utilization, you may need to upgrade to a larger hard drive, or opt to upgrade to an SSD drive. SSD drives are very affordable now, and have data-transfer rates far above that of traditional hard drives. If you’re having CPU utilization issues, then explore other CPU troubleshooting tips to nail down the culprit that’s chewing up all of your CPU resources.
